Pages

Saturday, August 27, 2016

FOBS

Found a easy and fun project for my Christmas gifts, fobs. I am already planning all the different designs I can make, dogs for E., R. and S., fishes for V., sports for the guys, something with French motive (or Canadian) for my Canadian friends...so many possibilities! The fabric designs will have to be small to be be visible on a 1 inch strip. 

Very easy, made 15 in 1 1/2 hours at an average of $1.45 each.


You will need:
Fabric strips, 10", 8"or 6"x 2" for large, medium and/or small fobs. Fabrics can be purchased for $0.97 a fat quarter. It should give you +- 24 strips.


Double sided fusible web strips cut of same length x 3/4" width (or hemming tape). Fold the long edges of the fabric by 1/2"so that it meets in the middle. Iron web into folded side of fabric.

Cotton webbing 1 1/4" wide or if you can't find it near you, use a dog leash (nylon webbing, same width) cut to length (at WalMart $9.97 for 20 ft and comes in 3 colors). You could get about 30 strips from one leash.


Key fob hardware, pack of 5 for $4.97


Candle to melt the edges of the nylon web to avoid unraveling.  

Bend the webbing with the fabric on the outside and hold the ends together. Insert the ends into the hardware and press it with the pliers (use a cloth between hardware and pliers to avoid marking it). Attach the ring to the fob and you are done.


For larger quantity, check the web for fobs hardware and web wholesale.


Friday, August 26, 2016

Zippered pouch.

Still with fabrics, trying new things, like this zippered pouch from a crafts magazine.


The MOST complicated instructions I have ever encountered! Not making another any time soon. Moving on to a new project from the same magazine, we'll see.

Quilts and pillow people

In between my crocheting I also worked with fabrics, making:


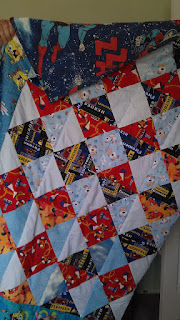
Two queen size quilts


Two twin size children quilts


and two pillow people

Crochet

I devoted the first few months of my NY time to learn to crochet. I learned to do a chain, single, half-double and double crochet and back-post single crochet. I also learned how to make a magic ring, crochet on the round and also on the opposite side of a chain. I made a few things to practice these stitches.

36 x 36 baby blanket with picot edging

a small (7"diameter basket) and some washcloths 

Crocheting is enjoyable and a good past time but I can't find any good use for it and yarn is more expensive than fabric. My kids and grand kids would rather have a quilt than an afghan, that little basket will be collecting dust somewhere and  the washcloths are for my husband, the only one who uses them.

All in all, it was a good experience and I learned something new. I might still make a few things here and there but I will stick with my favorite, fabrics!

Monday, May 16, 2016

Flip flops summer wreaths

Saw this cute idea fort a flipflop wreath in Pinterest and had to make one.


Needed:
24" wire wreath cut in half
8 medium size (7-10) flip flops in bright colors
glue gun
summer motif decorations (from the dollar store)
ribbon
wooden letters to spell "welcome", "good day" or the saying of your choice. No more than 8 letters long or you will have to change the design.

Cut wire wreath in half, fold ends with pliers and wrap it with ribbon for safety.
Insert node of flipflop (between toes) into top area of wreath, tie it with floral wire.
Apply hot glue to 3rd and/or 4th wire, apply pressure to secure till dries. This will keep the flip flops in place.

Add ribbon for hanging

Turn it to front and apply decorations and lettering as you wish.


Monday, April 4, 2016

Terracotta pots lighthouse

My second project of the month was a terracotta lighthouse made of, guess, terracotta pots and saucers.

The project is easy but my quest for perfection made difficult. Hint: choose a easy design, there are plenty of pictures of lighthouses in the internet but I had to pick the hardest one...the spiral!

You will need:


  • 1 large terracotta saucer for the bottom, something that when flipped over will accommodate the rim of your first pot.
  • 3 terracotta pots in decreasing size (as you like). Try it at the store to see the fit.
  • 1 small terracotta saucer to fit the top pot.
  • 1 battery operated votive candle (dollar store 3 for $1) or if you don't feel like turning it on and off  every day, do it like me and get a solar light (Walmart $1) and cut off the bottom stick.
  • 1 tube of GE silicone caulking (check date, ready my previous post)


Set up your pots as seen in the pictures (make sure to add plenty of silicone as the pots are uneven and may not touch the previous ones all around).

Wait for it to dry. Paint it, add details, etc. Set it with a clear lacquer if you want. PS: I also used an white primer before my painting.

Glue light on top, add embellishments and you are done. It came out very pretty and the light really works.


Almost done. 


The little fences around the top and the doors came from a plastic soldiers set but you can use anything or make windows instead of doors.


The "glue"used.


Sunday, April 3, 2016

Garden balls.

Two more projects done. Garden decor bowling balls.

Saw this project all over the internet, so I can't tell where it came from.

I used two bowling balls donated by a neighbor, they were designated to the trash. One ball was golden and the other blue. I covered the golden with pennies (collected in jar for many years) and for the blue one I used green/blue/white glass pebbles from the dollar store.

One good tip I found was to use GE silicone instead of glue and to make sure it was a fresh tube. I learned the hard way, after spending my morning gluing my pebbles, I came back to the craft table to find them all over the floor!

So here is how it goes:

Prepare you bowling balls by cleaning it well and sanding it a bit with sand paper. Clean it again.

Get your silicone and pebbles/pennies ready. Start from the top and work your way down to about quarter way (you may need to put masking tape or something to prevent it from slipping down).

Wait till dry, Flip over and start on the other side.

Wait till dry again and you will be able to work in the middle section with the dry ones holding it in place.

I cover the holes with corks (good use of my wine corks collection) because I didn't want any garden critter making that a home, I live in Florida where small garden snakes and frogs abound!

Easy!

GE 100% silicone tube good for one ball or you can use the larger tubes and a caulking gun.


Where the date is. Fresh tube.

Glass ball, used about 3 1/2 bags of pebbles from the dollar store.


Pennies ball. 

So there you have it. Now go looking for those old bowling balls and save them from the landfills. 


Sunday, January 3, 2016

Arm Knitting

Been out of the blog world for a while. Christmas was a busy time but I discovered a new craft that I am obsessed with it: Arm Knitting. Made 5 infinity scarves already. The first one took me a while because I missed a loop and had to start over again but after that my timing is getting better at 1 hr for a longer/wider scarf and about 45 minutes for a smaller one. It is a pretty easy craft but you are literally tied up for the duration.

Here is the first two I made (photo is blurred to protect the innocent)

Close up 


The best instruction I found was in YouTube by Crafty Gemini and here is the link: Crafty Gemini

Hope you have as much fun with it as I had. Enjoy!

PS: The beautiful, thick, warm and soft yarn used was Bernat Blanket